Saturday, January 15, 2011

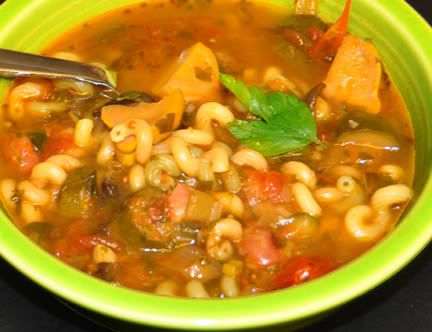
Summer Vegetable Soup in the Crockpot


serves 6-8

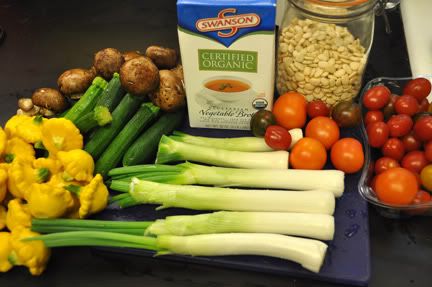
6 large spring onions with tender green parts, sliced
8 baby zucchini, sliced in 1/4” rounds
8 baby yellow pattypan squash, quartered
2 cups assorted cherry tomatoes, halved or quartered, depending on size
4 baby bella mushrooms, sliced and then slices halved vertically
1 - 2 cloves garlic, minced
2 stocks of cerlery 
1/4 tsp dried crushed red pepper
1/3 cup dry Christmas beans, rinsed
4 cups vegetable broth
1 cup prepared pasta sauce
1 cup water
kosher salt
freshly ground black pepper
1 heaping cup dry pasta
4 Tbsp chopped fresh parsley
1 Tbsp chopped fresh basil
1/2 tsp chopped fresh marjoram
1/2 tsp chopped fresh oregano
1/2 tsp fresh thyme leaves
1 Tbsp good olive oil
Parmesan and Romano cheeses, optional, for garnish

Place onions, squash, tomatoes, mushrooms and garlic into crockpot. Rinse beans in hot water, and add to cooker. Pour in the broth, pasta sauce, and water. Cover and cook on HI for about 6 hours, or until beans have reached desired tenderness.

20 minutes before serving, add salt and pepper to taste. Stir in the pasta, fresh herbs and olive oil. When pasta is done, taste and adjust seasonings. Serve with grated Parmesan and Romano cheese, if you like. 


Friday, December 17, 2010

Miso Soup

For 4 servings:

ingredients:
5g (.02oz) dried seaweed
120g (4oz) soft tofu
400ml (.75 pint) dashi
1.5 tbsps miso paste
2 spring onion

heat the dashi on the high heat
add water to dried seaweed in the small bowl
melt the miso with the dashi and pour in the dashi pot
cut the tofu in small cubes
add the seaweed to the pot and let it stay for couple mins.
Do not let it boil.

Sunday, December 12, 2010

Bí quyết nấu cơm

Bí quyết nấu cơm
Ngày nay nhiều người sẽ bảo cơm thì có khó gì để nấu. Vo gạo rồi cấm điện thế là xong. Nhưng những mẹo nho nhỏ sau đây sẽ giúp cho bạn có bữa cơm ngon hơn.
 Nhiều người sẽ bảo cơm thì có khó gì để nấu. Vo gạo rồi cấm điện thế là xong. Nhưng những mẹo nho nhỏ sau đây sẽ giúp cho bạn có bữa cơm ngon hơn.
1. Nấu cơm bằng nước gì?
Nấu bằng nước sôi: thông thường chúng ta quen dùng nước máy để nấu cơm. Tuy nhiên nước máy có chất Clo đã làm tổn hao khoảng 30% vitamin B1 trong gạo. Nếu chuyển sang phương pháp nấu bằng nước sôi thì sẽ tránh được bao tổn ấy.
Nấu bằng nước trà: nếu dạ dày của bạn không tốt, chỉ cần vài bữa cơm nấu bằng nước trà, bệnh sẽ thuyên giảm. Bạn dùng 0,5 - 0,7g trà khô đun sôi với khoảng 500 - 1000g nước, sau khi sôi, lọc hết bã rồi cho vào nồi gạo đã vo sẵn.
Không được dùng nước trà đã qua đêm đem nấu cơm.
Nếu muốn cơm không bị thiu nhanh và trắng hơn, bạn nên cho vào 1 lượng giấm (5% so với lượng nước và gạo). Ví dụ: 1000g gạo thì dùng 1500g nước và khoảng 12g giấm.
2. Khử mùi cơm nguội.
Cơm nguội dù hấp thế nào cũng có mùi do đó trước khi hấp bạn nên cho vào cơm một ít muối ăn.
3. Khử mùi cơm khét.
Bỏ một cục than đỏ vào một cái chén, cho vào nồi cơm bị khét, đậy nắp lại trong 10 phút. Nếu chỉ mới chớm khét, bạn chỉ cần bỏ vào nồi cơm vài cọng hành, đậy nắp lại vài phút. Bạn có thể lấy một tờ giấy sạch gói một cục than củi đặt lên trên mặt nồi cơm, đậy nắp lại trong ít phút.
4. Cách chữa cơm bị sống.
Nếu trường hợp này xảy ra, bạn rưới vào cơm một ít rượu gạo và để lửa nhỏ một lúc, cơm sẽ chín như thường.

Sweet Ham for Holiday Dinner


imgres.jpg

Ingredients:
1 head of lettuce, washed and leaves cut or torn into large pieces
2 tomatoes, sliced or quartered
½ red onion, thinly sliced
1 avocado, sliced or diced
1 tbs finely chopped cilantro
Juice of 2 limes
2 tbs olive oil
Salt and pepper to taste
Preparation:

  1. To make the dressing whisk the chopped cilantro, lime juice, olive oil, salt and pepper together.
  2. Combine the lettuce, tomatoes, onions and avocado in a large bowl.
  3. Toss the salad with the dressing and serve.


Wednesday, December 8, 2010

Daring Dumplings


Chinese Dumplings/Potstickers
recipe courtesy of Jen from use real butter
pork filling
1 lb ground pork
4 large napa cabbage leaves, minced
3 stalks green onions, minced
7 shitake mushrooms, minced (if dried – rehydrated and rinsed carefully)
1/2 cup bamboo shoots, minced
1/4 cup ginger root, minced
3 tbsp soy sauce
2 tbsp sesame oil
2 tbsp corn starch
OR
shrimp filling
1/2 lb raw shrimp, peeled, deveined, and coarsely chopped
1/2 lb ground pork
3 stalks green onions, minced
1/4 cup ginger root, minced
1 cup water chestnuts, minced
1 tsp salt
3 tbsp sesame oil
2 tbsp corn starch
dough
Note: you will want to double this for the amount of filling listed – I just tend to use leftover pork filling for soup meatballs. A single batch will yield about 40 dumplings depending on size.
2 cups all-purpose flour
1/2 cup warm water
flour for worksurface
dipping sauce
2 parts soy sauce
1 part vinegar (red wine or black)
a few drops of sesame oil
chili garlic paste (optional)
minced ginger (optional)
minced garlic (optional)
minced green onion (optional)
sugar (optional)
Combine all filling ingredients in a large mixing bowl and mix thoroughly (I mix by clean hand). Cover and refrigerate until ready to use.
Make the dough, Method 1: Place the flour in the work bowl of a food processor with the dough blade. Run the processor and pour the warm water in until incorporated. Pour the contents into a sturdy bowl or onto a work surface and knead until uniform and smooth. The dough should be firm and silky to the touch and not sticky.[Note: it’s better to have a moist dough and have to incorporate more flour than to have a dry and pilling dough and have to incorporate more water).
Make the dough, Method 2 (my mom’s instructions): In a large bowl mix flour with 1/4 cup of water and stir until water is absorbed. Continue adding water one teaspoon at a time and mixing thoroughly until dough pulls away from sides of bowl. We want a firm dough that is barely sticky to the touch.
Both dough methods: Knead the dough about twenty strokes then cover with a damp towel for 15 minutes. Take the dough and form a flattened dome. Cut into strips about 1 1/2 to 2 inches wide. Shape the strips into rounded long cylinders. On a floured surface, cut the strips into 3/4 inch pieces. Press palm down on each piece to form a flat circle (you can shape the corners in with your fingers). With a rolling pin, roll out a circular wrapper from each flat disc. Take care not to roll out too thin or the dumplings will break during cooking. Leave the centers slightly thicker than the edges. Place a tablespoon of filling in the center of each wrapper and fold the dough in half, pleating the edges along one side (see images above).
To boil: Bring a large pot of water to a boil and add dumplings to pot. Boil the dumplings until they float.
To steam: Place dumplings on a single layer of napa cabbage leaves or on a well-greased surface and steam for about 6 minutes.
To pan fry (potstickers): Place dumplings in a frying pan with 2-3 tbsp of vegetable oil. Heat on high and fry for a few minutes until bottoms are golden. Add 1/2 cup water and cover. Cook until the water has boiled away and then uncover and reduce heat to medium or medium low. Let the dumplings cook for another 2 minutes then remove from heat and serve.
To freeze: Assemble dumplings on a baking sheet so they are not touching. Freeze for 20-30 minutes until dumplings are no longer soft. Place in ziploc bag and freeze for up to a couple of months. Prepare per the above instructions, but allow extra time to ensure the filling is thoroughly cooked.
To serve: Serve dumplings or potstickers hot with your choice of dipping sauce combinations.
Wednesday, November 24, 2010

Super-moist Perfect Roast Chicken

http://www.priscillaliang.com/2010/09/super-moist-perfect-roast-chicken-recipe/

I never roasted a chicken or turkey before, and thanks to Jamie Oliver’s recipe, my first time roasting a whole bird was a huge success!

The chicken was so moist, so perfect, so tender, so tasty!  & best of all, SO EASY to make!
I seriously never knew you could roast a chicken this easy!
WOW! Jamie Oliver – such a genius!  Thank you!
& I served the chicken with a bit of gravy, corn and potatoes.
For the potatoes I learned it from ma friend Marc!  You first boil the potatoes until they are soft.  Then simply pan fry them with herbs, salt, pepper and a little bit of olive oil.  Beau loves it!!  =D
~*~*~*~*~*~*~*~*~*~*~*~*~*~*~*~*~*~*~*~*~*~*~*~*~*~*~*~*~*~*~*~*~*~*~*~*~*~*~*~*~*~*
Easy Super-moist Perfect Roast Chicken recipe
Inspired by Jamie Oliver’s Perfect Roast Chicken Recipe
Ingredients:
Chicken ~ 1 (I couldn’t find any organic ones so bought all-natural chicken instead)
Baby onions ~ a lot!  (aka pickling onions)
Carrots ~ 2, chopped
Celery ~ 2, chopped
Garlic ~ a lot!
Lemon ~ 1
Lime ~ 2 (sliced)
Fresh thyme, Italian spice, rosemary, bay or sage, or a mixture
Olive oil
Garlic salt (optional)
Instructions:
1. Drizzle all the veggies and garlic in a roasting tray with olive oil and season well with salt and pepper.
2. Make the bird happy by massaging and rubbing it with olive oil, garlic salt (or simply salt), pepper, and herbs.
3. Stuff some of the veggies to the chicken –> this is a key to keep the chicken flavorful and moist!
4. Pile the veggies and garlic in the middle and sit the bird on top of it.
5. Put some sliced lime on top and put the lemon inside the chicken’s cavity, with the bunch of herbs
6. You now have a choice to roast the chicken immediately, or marinate it over night.  I did the latter and the result was a more delicious chicken!  Look at the color after it sitting in the fridge while I was sleeping.  =p
7. Preheat the oven to 475°F.
8. Make sure the chicken breasts face down on top of the veggies –> another trick to ensure moist, tender, flavorful meat.
9. Put the chicken in the preheated oven.  Turn the heat down immediately to 400°F and cook the chicken for 1 hour and 20 minutes.
10. Keep an eye on your chicken.  If the veggies look dry, add a splash of water to the tray to prevent them from burning.
11. Around the 1 hour mark when the skin looks brown, turn the chicken so the breasts face up.  You are now giving the chicken breasts a nicer color.
12. When cooked, transfer the chicken to a board to rest for 10-15 minutes.
13. Cover it with tinfoil and a towel.  Once it cools down, carve and server!

Super-moist Perfect Roast Chicken

I never roasted a chicken or turkey before, and thanks to Jamie Oliver’s recipe, my first time roasting a whole bird was a huge success!

The chicken was so moist, so perfect, so tender, so tasty!  & best of all, SO EASY to make!
I seriously never knew you could roast a chicken this easy!
WOW! Jamie Oliver – such a genius!  Thank you!
& I served the chicken with a bit of gravy, corn and potatoes.
For the potatoes I learned it from ma friend Marc!  You first boil the potatoes until they are soft.  Then simply pan fry them with herbs, salt, pepper and a little bit of olive oil.  Beau loves it!!  =D
~*~*~*~*~*~*~*~*~*~*~*~*~*~*~*~*~*~*~*~*~*~*~*~*~*~*~*~*~*~*~*~*~*~*~*~*~*~*~*~*~*~*
Easy Super-moist Perfect Roast Chicken recipe
Inspired by Jamie Oliver’s Perfect Roast Chicken Recipe
Ingredients:
Chicken ~ 1 (I couldn’t find any organic ones so bought all-natural chicken instead)
Baby onions ~ a lot!  (aka pickling onions)
Carrots ~ 2, chopped
Celery ~ 2, chopped
Garlic ~ a lot!
Lemon ~ 1
Lime ~ 2 (sliced)
Fresh thyme, Italian spice, rosemary, bay or sage, or a mixture
Olive oil
Garlic salt (optional)
Instructions:
1. Drizzle all the veggies and garlic in a roasting tray with olive oil and season well with salt and pepper.
2. Make the bird happy by massaging and rubbing it with olive oil, garlic salt (or simply salt), pepper, and herbs.
3. Stuff some of the veggies to the chicken –> this is a key to keep the chicken flavorful and moist!
4. Pile the veggies and garlic in the middle and sit the bird on top of it.
5. Put some sliced lime on top and put the lemon inside the chicken’s cavity, with the bunch of herbs
6. You now have a choice to roast the chicken immediately, or marinate it over night.  I did the latter and the result was a more delicious chicken!  Look at the color after it sitting in the fridge while I was sleeping.  =p
7. Preheat the oven to 475°F.
8. Make sure the chicken breasts face down on top of the veggies –> another trick to ensure moist, tender, flavorful meat.
9. Put the chicken in the preheated oven.  Turn the heat down immediately to 400°F and cook the chicken for 1 hour and 20 minutes.
10. Keep an eye on your chicken.  If the veggies look dry, add a splash of water to the tray to prevent them from burning.
11. Around the 1 hour mark when the skin looks brown, turn the chicken so the breasts face up.  You are now giving the chicken breasts a nicer color.
12. When cooked, transfer the chicken to a board to rest for 10-15 minutes.
13. Cover it with tinfoil and a towel.  Once it cools down, carve and server!

Roasted Chicken with Vegetable

Roasted Chicken:
- string
- thym
- onion
- carrot
- celery
- butter
- water
- bell pepper


Buy a nice roaster chicken. Roasters will give you a much more juicy flavorful dinner then a fryer chicken will. I only cook for myself so I go for 4-5 pounder.
2
Season the bird with salt, pepper, and paprika. I also like to add garlic and onion powder to the bird.
3
Stuff half a lemon inside the carcass.
4
Run butter over the outside of the chicken. this will help to give it that beautiful brown skin that you want to see.
5
Place the breast side down and cook the chicken at high for 20 minutes.
6
Once the machine beeps, flip the chicken over and cook on high for another 40 minutes. If you have a pop up timer in the chicken then go by that, if not then invest in a meat thermometer and stop cooking it when the internal temperature in the breast gets to 165 degrees.
7
Let the chicken sit for 10 minutes before carving. This will let the juices settle, and make for a much more tasty and moist bird.

Gravy


Gravy:

For each 2 cups gravy desired - 
use 3 tablespoons fat, 
3 tablespoons all-purpose flour, 
and 2 cups of liquid. 
Use salt and pepper to taste.

Remove the cooked turkey and rack from the roasting pan. Transfer turkey to a cutting board with a lip to collect juices and let the turkey rest before carving. While the turkey is resting, make the gravy.
Place roasting pan (with the drippings and fat) over two (2) burners on your stovetop over medium heat (always make the gravy in the same pan you used to roast the turkey).
Skim and discard any excess fat from the juices in the roasting pan. See Turkey Gravy Ingredients above for amount of fat to use in your gravy.
An easy way to remove the fat is to pour the turkey juices and fat into a large measuring cup or bowl. The fat will float to the top of the bowl. Skim off all but about 3 to 4 tablespoons fat (the amount you need to make your gravy) and return it to the turkey roasting pan; discard the remaining fat.
Using a heavy spoon, scrape all the dark drippings and any crunchy bits from the sides and bottom of roasting pan. Leave them in your roasting pan as these are what add great flavor and a nice rich color to the gravy.

Add the turkey giblet stock, that you previously made, to the roasting pan. 


Meatloaf Gravy:

meatloaf gravy:
http://www.5min.com/Video/Beginning-Meatloaf-Gravy-149489444
1 table spoon of butter, 
heavy cream
1 chop onion
flour
meatloaf mixer lelt over, 
1 teaspoon thyme
1 cup of white wine
2 cup of chicken stock

put 1 table spoon of butter in the saucepan then add onion for 1 min then add meat or meatloaf mixer, add salt and pepper stir well constantly, 1 table spoon of tomatoes paste,  1 or 2 flour, cook through the flour, add white wine,  stir until the paste has form and shimming for 1/2 hour or 45 mins, then add chicken stock, and heavy cream, taste and add pepper and thyme then stir to boil